Lets assume you already have a project to work from that will generate a useful specification and press ‘F6’ or the ‘Generate Specification’ on the toolbar.
I want to explore the available options on each tab of the configuration window and show the effect each has on the generated spec.
Pages – a blessing for BA’s working within an iterative project
So the first tab, ‘Pages’ allows you to select which of the pages within your project you wish to include in the generated specification.
Starting with the first options, there is an option to include the pages section and give it a title and directly beneath that an option to specify whether to include a sitemap and change it’s title.
Then the next section allows you to select what pages will be included in the generated spec. This is particularly useful when developing in an iterative approach where the specification is built a functional area or module at a time. This way you can flesh out the annotations / notes for the relevant pages and leave out those that are not finished.
When generated in the specification, the following section of the spec is effected by the ‘Pages’ configuration options.
Masters: to repeat – or not to repeat?
Masters in Axure are used to define common elements that appear across the system and allow a centralised governance. Make a change for one master and its applied across them all. It’s a concept that is used in traditional manual specifications but is harder to manage – primarily because it relies on manual processes to apply changes to the relevant areas.
In your specification, you have the option to print out all or a select few masters as you did with pages, change section and heading titles.
The interesting set (the other options are essentially the same as document above for ‘Pages’) are around which masters to generate and whether to generate them once or as they used per page.
The first option – ‘Only List Generated Masters’ is useful if there are masters in the project that are not being generated because of one of the other options in this screen (explained below, but useful for the iterative / modular spec approach).
‘Only Generate Masters Used on Generated Pages’ only includes masters that are are used in the selected pages from the ‘Pages’ tab. If ‘All Pages’ is set on that tab by definition all masters will also all be displayed.
‘The ‘Do Not Generate Masters Set as Custom Widgets’ does exactly that, funnily enough. Some masters can be set to behave like custom widgets and this allows them to removed from the master list if necessary. This could be useful if you are using a master in a different, possibly more dynamic way, than standard masters and wanted to differentiate it from the other masters in the list.
The last option allows you to generate the master in each page that it appears, rather than the standard approach of generate once and reference it when it is used elsewhere.
So that translates to the following rendering in the specification.
Un-ticking the ‘Document Masters in Page Sections’ box displays a nice section at the bottom with all of your masters like the above.
… and ‘Ticking’ the box displays the master as it appears within the page as if it was a normal widget on the page.
The above ‘repeat on each relevant page’ approach may prove useful in situations where the generated specification does not include the whole system context and therefore it may not make sense to list them out separately
Notes – adding extra detail to your specifications
The ‘Notes’ tab doesn’t offer too much additional configuration elements other than whether to include page interactions (‘OnPageLoad’ events/conditions) or not.
Similar to the other tabs of, the main configuration options are around whether you generate all or select few, rename the title or change the order of each notes.
The last tickbox for ‘Include Page Interactions’ determines whether ‘OnPageLoad’ events are generated into the specification or not.
Screenshot – to power to present pictures
I find the screenshots within the generated specifications to be one of the most useful features of Axure-drive specifications and a primary-driver for using the tool in my projects.
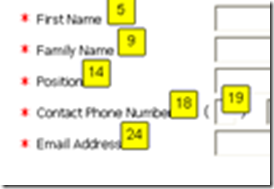
As such, I find the ‘Show footnotes on screenshot’ option the most useful feature behind the annotations tables and always have it selected. There might arise an occasion where a specification was required where just clean screenshots of the interface was required, free from any overlaid footnote references. This would be a perfect time to use this option.
The ‘Put border on screenshot’ surprisingly does just that, adds a solid border around all screenshots – not a favourite of mine and wouldn’t suggest you use it.
‘Do not scale footnotes with screenshot’ option keeps to the footnote markers the same size when scaling out screenshots. A useful feature if you plan to resize the screenshots,
You can see the difference in scaling at not-scaling of the footnotes.
The last option, ‘Apply default OnPageLoad cases’ refers to applying the default ‘OnPageLoad’ event to the screenshot. This is useful when generating from a dynamic prototype which has an ‘OnPageLoad’ condition that you want to capture in the specification.
Annotations – the meat of the specification
As I mentioned before, the annotations are the single-biggest feature of the specification generation in Axure and a feature which turns the product from a useful prototyping application to a platform for managing the specification and design life-cycle.
This tab generates the tables based on the annotations for each page element/widget and provide a very powerful and automated way of generating field specifications.
As with the other tabs, select the annotations that you wish to include and the order in which they should appear. When correctly annotated and rendered into the word template, the above selection of annotations look like the following.
Defining the appropriate annotations to use in your project is another matter entirely and beyond the scope of this post, but the above should give an indication of how it can be used effectively.
Widgets – including dynamic options in the specification
There are likely to many cases where a prototype has been built with specific dynamic features built in that the client really liked and wants in the application. Seeing as they have already been built into the prototype, why not re-use what’s been done and expand on it for the functional specification?
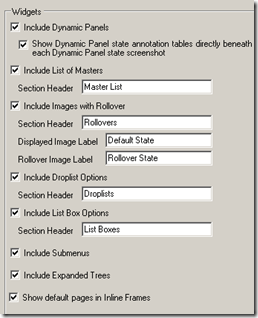
The ‘Widgets’ tab provides such options for including the dynamic properties of widgets such as rollover states, drop-list options, and list box options.
Most of the options are fairly self-explanatory, if you use any of dynamic behaviours from above in your prototypes, then tick the option to include it within the specification.
Examples of such options within the spec are below.
Droplist values are vital if creating a complete functional specification.
Rollover states are also very useful within a specification to give context around a how a particular rollover works and what exactly happens.
If you have read my Replicating AJAX-style lightbox within Axure prototypes post, you should recognize the above rollover definitions.
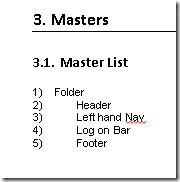
One really useful feature I routinely use in my specifications is the ‘ Include List of Masters’ option. This provides a small heading and list of all masters used on the current page. Very useful if you are not repeating masters on every page which is normally the case.
The master list (although not styled in the above screenshot) adds the reference back to the pre-defined master and avoids you needing to repeat for each page.
Last but not least – 1 column vs. 2-column formats
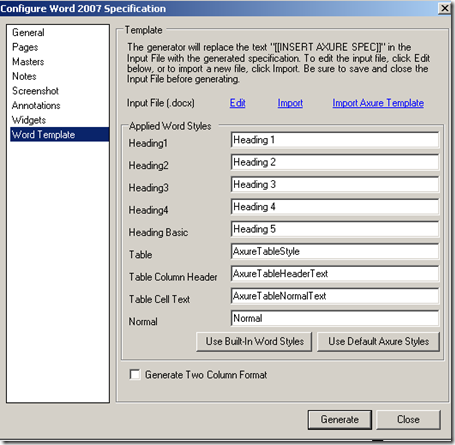
The last tab is the ‘Word Template’ options which I detailed in my post, Axure specification templates explored and the only option I didn’t cover in there was ‘Generate Two Column Format’.
This feature does exactly what it infers, generates the specification into two side-by-side columns. To me, the obvious application of this if you are wanting to generate simplified specifications on large paper (A3+) where the field specifications and screenshot are displayed on a single page.
The above screenshot was taken of a two-column format specification.
Finished!
Wow – that was a lot of content and a lot of detail, so I hope that proves useful to you all.
The aim of these posts is to convince people that using Axure as a platform for managing specifications and re-using prototype work is a very smart solution and can reduce a great amount of rework and increase specification accuracy.
I think my next post will target annotations and what to choose to get a specification both developers, testers and the client can all understand and find useful.


